
INSTRUCTION OF BIKE SERVICE STATION
HOW TO FIX BIKE AT SERVICE STATION?
Learn simple methods that will allow you to repair your bike quickly and enjoy the ride. Learn how to mount accessories, how to tighten the screws on the bike, or how to use it.
TIGHTENING "LOOSEN" SCREWS
Once in a while, you should check if all the screws in your bike are properly tightened and there are no so-called „slack”. Over time, some parts unscrew spontaneously, so they are not sufficiently welded together. In this case, each individual component should be checked and tightened where necessary in order to avoid faster operation and to avoid dangerous injuries caused by faulty equipment. However, remember not to use too much force when tightening the threads so as not to damage them.
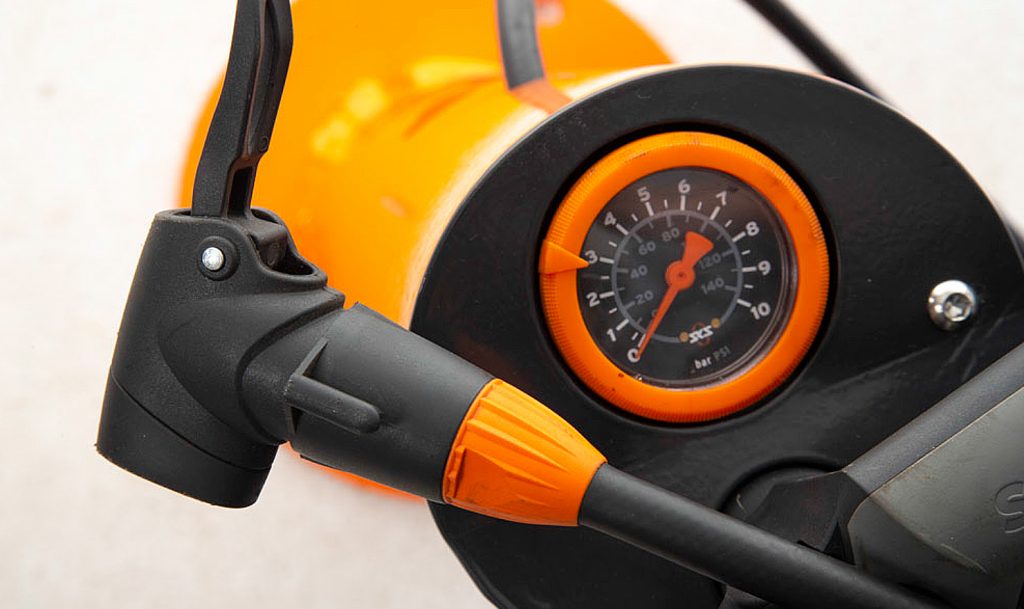
WHEEL PUMPING
• Position the wheel so as to gain convenient access to the valve and remove the plastic cap.
• Fit the correct pump air adapter to your bike’s Presta or Schraeder valve.
• Push the lever on the adapter down to secure and close it.
• Test the pressure range (BAR/PSI) suitable for bike. You will find this information on the side of the bike’s tyres. Usually it’ s 3 BAR.
• Inflate the tyre. Ensure you are monitoring the pressure gauge whilst doing so.
• Remove the pump’s adapter and hook it back to the pump station.
• Fasten the plastic cap or metal nut on the valve.
INNER TUBE REPLACEMENT
• Turn the bike upside down so it is resting on its handles and saddle.
• Change the derailleur to the smallest sprocket to make the job easier.
• Release the brake. Grip it with your hands at first then free the cord (this doesn’t apply in case of disc brakes).
• Open the wheel clamp or loosen the nut on the axle, then remove the wheel.
• Push the tyre levers against the rim then pry the tyre, dragging one lever around the rim to separate it.
• Remove the inner tube.
• You can either fix the inner tube by using the tyre patches, but it is safer to replace the inner tube.
• Inflate the inner tube gradually, but not fully, and place it inside of the tyre starting from putting the valve into the rim.
• Put the tyre bead back on the rim using the lever. Fully inflate the inner tube and the tyre.
• Fit the wheel back onto the bike frame and attach the brake.
DISC BRAKE ADJUSTMENT
There are two basic variants of disc brakes – mechanical (cable) and hydraulic (brake fluid). Manufacturers’ solutions often differ from each other, so it’s best to use the manual of a specific brake. If, however, we do not have such a possibility, the following points can greatly facilitate the repair of the equipment.
• In disc brakes, one pad presses the disc while the other stays stationary. The position of the fixed block can be adjusted with a special knob or screw so that it is in the position closest to the disc, but does not rotate it.
• In the next step, we can adjust the position of the second block by setting the regulators at both ends of the armor. We want the pad to be positioned as close to the disc as possible, without unwanted friction.
• In conclusion, it is a good idea to check your brake pads regularly for wear. If the pads are not worn, the brake is properly adjusted, and yet you feel a decrease in braking force, you should immediately go to a qualified bicycle service.
V-BRAKE ADJUSTMENT
• Slowly unfasten the screw keeping the cord on the brake arm.
• Loosen the brake block’s cap while pressing down the brake arm against the disc.
• Check the position of the brake blocks. If they are set at the correct distance from the brake arms, press down both brake blocks against the disc and measure the distance between the end of a cord hook and the other brake arm. It should not be less than 39mm. Ensuring they are at the correct distance prevents friction between the brake arms when braking.
• Now press both brake blocks to the disc while checking the positioning of the brake block. It must me straight and do not cause any friction.
• Put the cord back into the mounting screw. Set the cord. The brake blocks must be 1 to 1.5mm away from the disc. Fasten the cord using the appropriate screw. Fasten the barrel screws on brake handles.
FRONT DERAILLEUR ADJUSTMENT
• Place the bike chain on the back of the largest sprocket and on the front of the smallest sprocket. The derailleur guide should be parallel to the bike chain. If it isn’t, loosen the clamping screw.
• Find two adjustment screws on the derailleur marked as L (low) and H (high). Fasten the L screw. You should stop fastening when the distance from the inner derailleur guide equals 1mm.
• Place the bike chain on the smallest sprockets on both front and rear ends.
• Turn the adjustment screw marked H (high) to the position of a 1mm distance to the bicycle chain.
• Finally, set the cord tension using the regulator in the handle. Make sure that the gears can shift smooth.
REAR DERAILLEUR ADJUSTMENT
• Change the gear ratio to the largest sprocket at the front and the smallest sprocket at the rear, then loosen the clamping screw.
• Turn the adjustment screw marked H (high) so that the derailleur wheels are level with the smallest sprocket in the cassette.
• Set the derailleur in the closest position to the wheel, secondly check the position of the derailleur wheels – they should be level with the largest sprocket in the cassette. If they aren’t then adjust their position using the L (low) screw.
• Slacken the cord now and fasten the clamping cap.
• Finally, check whether the gears are shifting smoothly. The bike chain shouldn’t experience any difficulties while moving to the higher sprocket. If it does, then you have to tighten the cord by using adjusters on both ends of the outer casing – on the derailleur side and on the shifter.
